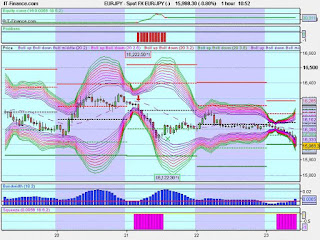
Forex indicators used:
Bollinger bands with MA of 18 and deviations of 2 through to 4.2
incrementing by 0.2
Bands 2 – 2.4 Purple
Bands 2.6 – 3 Pink
Bands 3.2 – 3.6 Red
Bands 3.8 – 4.2 Green
MACD with settings:
Short term MA: 5
Long term MA: 13
Signal number periods: 1
Bollinger Bandwidth with settings:
MA periods: 18
Standard deviation: 2
Indicator Settings
Trigger level
Horizontal line at a value which is determined by currency pair EUR/JPY ~ 0.0056
Pivot Deviation
Distance from a pivot point in which the signal is still valid - 14
MACD Threshold
Threshold of the deviation of the MACD that signals an exit - 6.2
Making sense of it all
The Bollinger bands are used to visually see the volatility of the underlying security. When they narrow, it shows that the market is not sure which way to push price. I.E no-one is buying or selling with urgency. When there is a lot of traders in the market to sell, you will see the market drop and the Bollinger bands increase in bandwidth. It is the same with an up-trending market as well.
It is the breakout of this constrictive time of the market that I use to enter the market. If this breakout is close to a pivot point, it makes the trade setup even more positive.
Entering a trade
The first thing to look for is the narrowing of the Bollinger bands. When the Bollinger bandwidth crosses under the trigger line, you want to keep an eye out for a low on the histogram followed by an increase in bandwidth. This is a signal that it maybe breaking out and that is the entry point. Enter the market long if the MACD is trending up or short if it is trending down. Put more simply, trade in the way that the market is breaking away.
When I enter a position, I enter a wide stop loss as the EUR/JPY can be volatile and go in the other direction before it trends in the predicted direction.
Exiting a trade
When the MACD histogram is starting to turn in the opposite direction of the trade with a certain threshold of this turn, it can signify an end to the rally. The threshold must be set at a level which is not too sensitive as to make you exit a longer profitable trade but not too lenient as to give much of your profits back. Experimenting with this level is the only way to know which is best for different pairs.
Another way to plan your exits is to stage out at differing pivot levels. Say you enter a trade when it breaks down from the Pivot point. You would exit say half your lots at the 1st support line and then move your stop loss up to entry. Then your remaining lots at the 2nd support.
Examples:
 The top red bars show a short. The bottom indicator pink bars show short entries which do not take into account pivot points. The last trade on the right in which I am still in is turning out quite profitable, I just don’t enter with as many lots as if it did line up with the pivot points. You can see with the restriction of the bands on the right that something big was going to happen, the system tells you when it is time. I set up alarms on the indicator to alert me when to enter a trade. With different pairs I have different voices, so On EUR/JPY I hear “enter long EUROYEN” when the signal is given and “exit EUROYEN”. Pretty cool but enables me not to be glued to the screens, which can be hard to get away from…
 Another short term trade short which resulted in a profit of 146 pips
-GCTrader1 from www.forexfactory-
