Monday, August 23, 2010

Panca Eagle Breakout Strategy

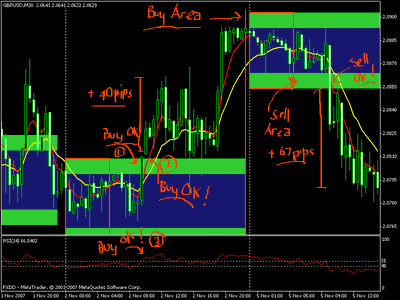
Panca Eagle forex strategy basically a method for determing support and resistance breakouts. The idea of this strategy is to determine previous range and take trading opportunities once the box is broken (with borders acting as support and resistance areas) using as a trigger the breaks above and below that range. Panca eagle indicator is simple enough to understand. It is not complicated to use; we just simply have to wait for a breakout above or below the green zone. As such, it requires no special skills in order to use it.
panca eagle breakout forex strategy

What you need
  • - Any pairs, EURUSD or GBPJPY recommended.
  • - Timeframe 30M - Panca Eagle Indicators
  • - EMA 5 (red line) and EMA 13 (yellow line)
  • - RSI 14 level 45 – 55
  • - Toptrend Indicators to avoid false signal.
Download all indicators here: Panca Eagle Indicators

Panca-Eagle Break Out Strategy rules:
1. Trading Hour:
You have to wait for the bars to get past the red box before you place an order at 10.30-21.00 WIB (GMT +7) in TF :30 Minute
2. Only 1 Buy & 1 Sell
3. No More Than 5-10% Equity each open trade
4. Minimum Take Profit = +10 pips for GU or GJ Pips protect, secure + 10 pips when your running profit +30 Trailing Stop 15 pips (optional)
5. You can use Pending Order : TP 30 ans SL 30 , Buy and Sell at Green Area After past the Box. But Recommended If You use instant execution.
6. How To Entry:
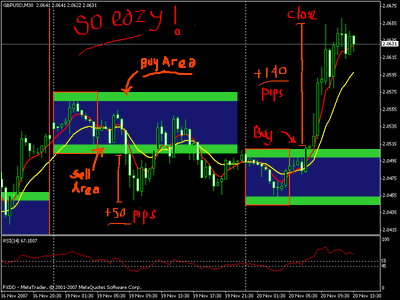
Buy when :
  • The price enter upper box green area after past the red Box 
  • EMA 5 (red line) Upper EMA 13 (yellow line)
  • RSI above 55 level
Sell when :
  • The price enter bottom box green area after past the red box
  • EMA 5 (red line) Below EMA 13 (yellow line)
  • RSI below 45 level
buy sell panca eagle forex strategy

 Avoid False Signal Using Toptrend Indicators
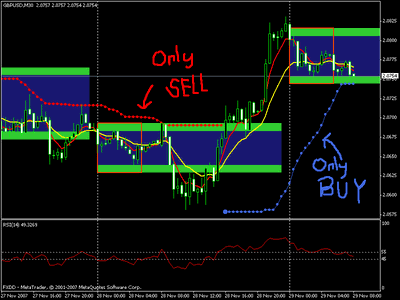
To Avoid False Signal, Before entering the market all signal must confirm with Toptrend  Indicator. Only doing sell position  if Toptrend Indicator is red and above price. And reverse only doing buy if Toptrend Indicator  is BLUE and below price.

Avoid False Signal Toptrend Indicator

Success Tips
1. Make sure and always confirm your action (buy/sell) with Trend Indicator (You can combine with your trend indicator). To help you avoid whipsaws.
2. Recommended to apply PIPSLOCK or TRAILING STOP example : pipslock rules:
  • Move your SL +5 after 20 pips profit.
  • Move your SL +10 after 30 pips profit
  • Move your SL +20 after 40 pips profit
  • Move your SL +30 after 60 pips profit etc….
3. Practice in demo account first to use pipslock… you can set pipslock according to your experience to protect your pips and you can use 15 pips trailing stop.
4.When current price is near buy/sell area, you shouldn’t do pending order. But if current price in middle of red box , You can put pending order with 15 pips Trailing Stop. But instant execution buy/sell, It’s recommended and for better result.

Source: www.fxstreet.com

Wednesday, August 4, 2010

Ichimoku Kinko Hyo Forex Strategy

The Ichimoku kinko Hyo indicator is designed of five lines called the tenkan-sen, kijun-sen, senkou span A, senkou span B and chickou span plus an area called kumo, it is the space between Senkou Span A and Senkou Span B. Ichimoku Kinko Hyo technical indicator is one of very powerful indicator and can bring can bring consistent results if used wisely . This indicator include in forex trend trading because it can predefined to characterize the market trend, support and resistance levels, and to generate clearly signals of buying and selling.

There are many ways to trade forex using Ichimoku Kinko Hyo , and here is one of the best forex trading strategy using Ichimoku chart pattern.

Forex Indicators set up:
1. Ichimoku (7,22,44) I don't know if there are better settings for this.
2. Stochastic Oscillator (Fast at 14,3)
3. MACD (2,10,4) or (3,15,5) I've found 2,10,4 is better imo
4. Fibonacci Retracement as well as other supports and resistances from other time charts.

Once all these are set we can now look at a chart. Starting from the first candle circled in yellow to the far left we notice that it is touching the red Kiju-Sen line of the Ichimoku Kinko Hyo indicator. This line is going to be very important to us as well as the clouds. After we have confirmed that it has touched the Kinju-Sen line we look down at our other indicators to confirm our position. In this case it is showing us a strong sell signal because if you look down at the Fast Sto the signal line is below as well as for the MACD. This is how we confirm this short position.

1. Is the candle touching the Kinju-Sen? Yes/No
2. Is the Stochastic showing a sell signal? Yes/No
3. Is the MACD showing a sell signal? Yes/No

If all three indicators give us a yes then this is a confirmation to open a position. And If no to any then you do NOT have Confirmation! To maximize your profits, set up your chart not only for 1H time frame. But set them up for smaller or even larger time frames (Smaller time frames will help you decide the markets direction for a larger time framed chart as well as larger time frames will give you key hints as to the trend/direction of smaller time framed charts). As you can see I drew support and resistance lines from the 30min chart. Here is two scenarios of how this first trade could have gone down.

Ichimoku Kinko Hyo Forex Strategy


Look at the red circle #1. As you notice in #1 it gives us a sell signal. All indicators say yes to sell so we do. We set a stop of about 20-30 pips and we wait. So after an hour or so we notice that our trade has broken its support. And down it goes staying within the uprights. It breaks through the small Ichimoku cloud which because this cloud is not very large its not really that exciting to us but then it breaks support again! and continues down. Until it hits a lower support line and comes back up to our Kinju-Sen line where in #2 it gives us a buy signal again to close our position and to open another trade if we want too.

We have closed our short (sell) position from #1 green/red circle and now open a long (buy) position at the #2 green circle because all indicators say yes. In this case because we are trading only on the Kinju-Sen line we would have taken a loss. We didn't know where to take our profit so we took a loss. This is okay its fine relax.

We have moved on to #3 green circle where we close our previous long position with a loss and open a new short position. Now before we move on I want to add something else. As you notice the Kinju-Sen lines goes horizontally and we lose some pips by closing our previous short once again and open a new long position. Here is one thing I want you to take a look at and test on your own.

Okay so take a look at the first close/open candle in #3. You will notice that the first candle gives us a close/open position but the second candle does not because not all indicators say yes. The Kinju-Sen line does not touch the next candle. This is good because the following candle means we can now close/open a new position (Like we have just done above) or in other cases add to our confirmation or to our position. Now take a look at how that candle confirms our new long (buy) position but the next candle does too? This is where a rule comes in.

• When closing/opening a trade we look to the next candle and if that candle is NOT touching the Kinju-Sen line then we can close/open a new trade on the second candle from our new position.
• If the first and second candle do touch then we must wait till the third or even the fourth candle to open/close a new trade.
• If we have waited on the third candle and it touches and still gives us a buy then we can add to our position.

Take a look at our new position #3 the second confirmation candle. As you can see the market moves up on our long position. It blows through the Ichimoku cloud and continues upward to #4 green circle. This is where the rule comes in again. It has been far more than 3-4 candles away and it doesn't confirm a close/short position but it confirms another buy position so we add to our long. It continues up to #5 red circle where it confirms a close/short position. We have now closed all our trades on this chart. We may have played #5 like we did in #3 or we may have played it even better.

To recap from #1-#5 we made a total of about 6 trades. The numbers are off on my chart but it is very close. Spread was not taken into consideration when doing those numbers. As well as the trades between the first confirmation in #3 to the next one in #3 and #4 was left out.

A total of 126 pips is not bad for three days of work. It was a modest play and this chart was a really great set up to display how this strategy works. Remember while you are trading and waiting on this 1 hour chart you can also be scalping lower timed charts of the same pair. This depends on your broker but if you have two accounts then you are golden. See more at: http://fxroot.com/content-11.html
Tuesday, July 27, 2010

Andrew Forex Trading System

This forex trading system was introduce on a forex forum by Andrew Forex . The interesting thing of this strategy was simple and effective to predict price movement. Using two mainly indicators; supertrend and Nonlagdot, or you could add another indicator if you like. Trading at any pair but better cross-pairs that give good trends. You can use it on anytime frame but recommended to use it on 4H time frame

Rules of  Andrew Forex Trading System

Buy Entry:
A dot of Nonlagdot changes from red to blue. At the same time dots of nonlagdot should be above the Supertrend line. Also the Supertrend line should be green. A position should be opened by execution of a pending order. The order is placed on the upper point of the market extremum, which is formed after the first rebounce of the market downward (when closing price is lower than previous one). That is one should wait untill the price has exceeded the point of extremum, and only then buy. However, if the price fails to exceed the level of the point of extremum, one should wait. After the formation of a new point of the market extremum, the order should be shifted to that point. If the color of nonlagdot or supertrend changes to red, the order shoud be canceled.

Andrew Forex  Trading System


Sell Entry:
A dot of Nonlagdot changes from blue to red. At the same time dots of nonlagdot should be under the Supertrend line. Also the Supertrend line should be red. A position should be opened by execution of a pending order. The order is placed on the lower point of the market extremum, which is formed after the first rebounce of the market upward (when closing price is higher than previous one). That is one should wait untill the price has exceeded the point of extremum, and only then sell. However, if the price fails to exceed the level of the point of extremum, one should wait. After the formation of a new point of the market extremum, the order should be shifted to that point. If the color of nonlagdot or supertrend changes to blue, the order shoud be canceled.

Andrew Forex  Trading System


Market entries without placing pending orders are not recommended. Pending orders for market entries are placed with the regard of the amount of the spread and additional 3 pips.


Exit position:
1. The price touches the Supertrend line, or
2. The Supertrend line changes its color, or
3. The price touches the first line of the Fibonacci fan. The Fibonacci fan is constructed from the point of the market extremum at the beginning of its movement and up (or down) to the opposite extreme point of the current market, that is, from the bottom to the top of the movement (when buying) and from the top of the movement to the bottom (when selling). It is important not to confuse: the Fibonacci fan is constructed not from the market entry point, but from the point of the beginning of directional movement or trend (up or down). Fibonacci fan line, which is closest to the price, serves as the exit level. And the exit order should be moved on this line.


Stop-loss is set:
1. On Supertrend line, or
2. Below near price swing, or
3. Under (over) the closest extremum of the market, which exceeds the Supertrend line in the opposite direction.

Stop-loss order is placed with the regard of the amount of the spread and additional 3 pips.

The following money management is recommended: either not more than 10% of the capital per trade, or a progressive system (e.g. Fibonacci or semi-martingale). Martingale is not recommended because it is far too risky in case of the lack of capital after several consecutive losing trades.

Adding is recommended solely to profitable positions after the regular change of Nonlagdot color in the direction of the current trend.

Attachment: Download Andrew Forex Indicators Here

Source: AndrewForex from www.fxstreet.com

Wednesday, July 21, 2010

Tom Demark Trend Line Forex Strategy

Tom Demark forex strategy is easy, simple but very powerful to take profit. It works with all pairs (major and others) which means you can have an entry for almost of the time. This strategy based on breakout method. You have got a knowledge how to draw Tom Demark trendline to use this strategy.

Tom Demark Forex Set up:

1. EMA 9, Ema 30
2. Momentum indicator (draw a horizontal line at the 100 point).
3. The hourly chart.>>
4. Draw a Tom Demark trend line (connecting at least 3 swing high (or low). And should avoid steep angles.

Entry:

Enter buy when the 9 ema crosses up the 30 ema and the momentum line is above 100. And price breaks the down trend line. (The trend line is our invaluable filter so make sure you do a lot of practice with it). Entry should be placed at the opening of the new hourly candle after the cross (to make sure the crossing and trend break are real and to keep away from whipsaw).

Tom Demark Trend Line Forex  Strategy Buy Position

Enter sell when the 9 ema crosses down the 30 ema and the momentum line is below 100. And price breaks the trend line, at the new hourly candle after the EMA crossing.

Tom Demark Trend Line Forex  Strategy Sell Position


The ema crossing can occur before or after the trend line break.

Stop loss :  40 pips (it has to be respected).

Target: from 40 pips up to 150 pips (depending on pair volatility and current situation).

Move your stop in the direction of trade in steps of 10 pips. When market reaches 75% of its daily range tighten your stop. When you see signs of reversal close order at market price. When you do not see any signs of reversal get rid of your limit and follow the price very closely with your trailing stop.


Demistifying Tom DeMark Trend Lines

My simple interpretation of what the article says regarding TD Lines (Tom DeMark Lines) is as follows:

TD Points

To draw TD Lines one first must identify TD Points (Tom DeMark Points). In all cases, the bar to the right of the TD Point being tested must be complete.

A TD Low Point (Tom DeMark Low Point) is a low bar which has a bar with a higher low immediately before and after it.

Therefore, when the bar before and/or after the low bar you are testing (to see if it qualifies as a TD Low Point) has the same low (double or triple bottom), the point does not qualify as a TD Low Point.

A TD High Point (Tom DeMark High Point) is a high bar which has a bar with a lower high immediately before and after it.

Therefore, when the bar before and/or after the high bar you are testing (to see if it qualifies as a TD High Point) has the same high (double or triple top), the point does not qualify as a TD High Point.

TD Lines

To draw the current lower TD Line (called the TD Demand Line), connect the the next most recent TD Low Point that is lower than most recent TD Low Point, to the most recent TD Low Point, then extend the line to the right. The lower TD Line must slope upward.

To draw the current upper TD Line (called the TD Supply Line), connect the next most recent TD High Point that is higher than most recent TD High Point, to the most recent TD High Point, then extend it to the right. The upper TD Line must slope downward. (www.forum.vtsystems.com)

Wednesday, January 27, 2010

London Breakout Strategy

This London Breakout Strategy was based on price breakout of the trendline. Using no basic indicators but trendline. This strategy using 1 Hour chart timeframe and recommended pair to trade were GBP/USD and EUR/USD. Other pairs may also be used to tested. This London Breakout strategy was claimed has a win ratio of over 90%. Before you go with live account is recommended to use a demo account until you are familiar with this strategy.

London Breakout Strategy Chart

Trading setup:

For this Forex system to work properly a trader needs to know the basics of drawing trend lines and be able to identify support and resistance lines.

Our working range includes 5 candles: from midnight to 04:00 EST (including the 04:00 candle). Optional: draw a midnight vertical line for visual aid.

With those 5 candles look for valid swing high and swing low of the price. Draw a downtrend trend line connecting a found swing high to the most recent swing high of the previous days (make sure the last one is a valid high to draw a downtrend trend line through it). Do the same for a swing low: connect it to the most recent swing low of the previous days, make sure you are putting in the right trend line using the rules of drawing uptrend trend lines.

If a trader sees, for example, no swings high in the 5 candle range, that means there will be no downtrend trend lines this morning.

The Entry is on the break of either one of the two trend lines and is immediate without waiting for a current candle to close. A protective stop is placed just above/ below the candle that broke the trend line.

Profit target:

Usually the whole trade will unfold within the next three candles (count in the candle that broke the trend line).
So, after the actual breakout we have 3 hours or 3 candles to trade, after that we will exit the trade with whatever profits are made.

Main rule - Using S/R + timing:

Profit target is going to be the nearest level of support or resistance according to the S/R lines.
If, however, after only one candle this target is reached, it suggests a very strong market, we would therefore stay in the trade and set our goal for the next support/ resistance level. We would also choose the second S/R level as our profit goal if the first S/R level appears to be close to our entry point.
We have three candles to trade after the breakout, thats why we can trade calmly and allow our goal to shift to the next S/R level.

It is at the traders absolute discretion whether to set the target at the nearest S/R level and exit the trade once the target is hit or use 2 or 3 consecutive candles.

Another simplified option would be with fixed targets and timing. For example, EUR/USD target = 20 pips - spread. GBP/USD = 40 pips - spread. These are only suggestions. For other currency pairs you will need to back or forward test. Thats it! Properly applied this London breakout strategy is more than 90% effective.

Source: BabyPips.com

Sunday, January 3, 2010

Basket Trading Strategy

This is a very simple forex strategy method and it is all base on price action, indicator free trading and it is done manually. First you have to open a demo account (Indicator Account –IA) and make sure that the broker you choose have the ff. pairs (must have) in their platform:

Most brokers have the following Pairs.
1. GBPUSD 8. CADJPY
2. EURGBP 9. AUDUSD
3. GBPCHF 10. USDJPY
4. CHFJPY 11. EURUSD
5. AUDJPY 12. EURCHF
6. EURJPY 13. GBPJPY
7. USDCHF 14 USDCAD

If you are using the IBFX Platform below are your pairs to Hedge:
1. GBPUSD 8. EURUSD
2. EURGBP 9. USDJPY
3. GBPJPY 10. AUDUSD
4. USDCHF 11. NZDJPY
5. NZDUSD 12. GBPCHF
6. AUDJPY 13. CHFJPY
7. EURJPY 14 EURCHF

The first seven pairs is set 1 and the second is set 2. These pairs will hedge each other. Fresh start this method at the very beginning of the week, this will give you a good look at the pairs as weeks goes on. Set 1 trade them SHORT and set 2 trade them LONG. No SL and no TP. As much as possible run a script (attached) so as to maintain correct timing in opening them. Click twice the profit column of your terminal so as to make the positive profit pairs stay at the top and the negatives stay at the bottom or vice versa. Initially the order of this pairs is a mess, let it run for a day or two and you will notice the pairs will start to make a proper order. All the buys will stay at the bottom and all the sells will occupy the top or vice versa. It like putting to rest the dirty bottled water and it will start to settle down after a certain period and all the dirt to the bottom and the clearer water at the top.

About a day or two, all the buys (if negatives) will stay below and the sell (if positives) will be at the top. Now the indication that you should watch is, ideally the bottom 7 slots should be occupied by the negatives, the first pair in the negative that crosses the boundary of positive and negatives is the pairs we are concern. If one of the negative jump to slot 8 (counting from bottom) there is also a corresponding positive that will jump to slot 7. This is one of our signals. We can trade those two pairs that jump out of boundary. There are ways of watching and trading this pair as they start jumping slots. I called this method the Jumping Pairs Technique. There are also numerous variations associated with jumping pairs that I will discuss later in the thread. Another profitable method of trading is the trading of 14 pairs straight Buy or Sell, criteria of which I will also discuss in the later part of the thread.

You should have another account where you real trading will be executed. You can trade the two pairs that jump out. If the pair that jumps up is LONG then trade the two breakaway pairs LONG or vice versa. I also trade the next two pairs that jump of the boundary. I limit myself to just 4 pair’s max 5 pairs being traded at one time. The profit is up to you, what I do is when the pair I’m trading retreats a slot or 2 slots then I close it. Or sometimes I just leave and the Profit Protection EA does the watching of the trade.

Remember do not touch your demo account as this will serve as your indicator and keep it running all the time and just check it once in while for any jumper pair and then trade them.

On the attached terminal copy, you can see the breakaway pair USDCAD and was traded and make some pips on it. Consequently the other pair GBPUSD also jump 1 slot down and can also be traded Long as well.


Note:
1) this method is manual.. Again manual... Indicator is fine.
2) I am trying to avoid any EA being made out of this system, indicators are welcome.
3) To those who will benefit from this method, my only request is to GIVE CREDIT TO WHERE CREDIT IS DUE this is given unselfishly free. Pipscorer/Trader101

Source : Forex TSD

Wednesday, December 9, 2009

IchiBrain Trading System

This forex strategy is a fusion of three forex trading systems : BrainTrend 7.1, Ichi360 System from ichi360.com and Double EMA Crossover. The attached image is the example chart you should be able to get by combining indicators.

Trading setup :

LONG :
  • Look for Blue/Cyan lines below the price and be careful if both Blue/Cyan and Red/Magenta are contradicting each other, and ge utterly careful when the bars are green. I don't trade in these conditions.
  • The double EMA crossover should confirm the bullish move, wait for a BIG GREEN ARROW UP, you can ignore the small ones.
  • At this point you can enter the trade, but if your not greedy and looking for consistency wait for Ichi360 indicator to confirm the bullish bias , the ichi360 indicator gives you exact entry point and you can use the BrainTrend indicator as trailing stop levels or exit, OR you can just wait for ichi360 to make a move in the other direction to exit.

SHORT :
  • Look for Red/Magenta lines above the price and be careful if both Blue/Cyan and Red/Magenta are contradicting each other, and ge utterly careful when the bars are green. I don't trade in these conditions.
  • The double EMA crossover should confirm the bearish move, wait for the BIG RED ARROW DOWN, you can ignore the small yellow ones.
  • At this point you can enter the trade, but if your not greedy and looking for consistency wait for ichi360 indicator to confirm the bearish bias, the ichi360 indicator gives you exact entry point and you can use the BrainTrend indicator as trailing stop levels or exit, OR you can just wait for ichi360 to make a move in the other direction to exit.

Picture 2
   

Download ebook and indicator here


Source : forex-tsd.com